Wednesday, November 18, 2015

Puzzle Game Research- Portal

Primary mechanics: Moving, jumping, carrying objects, shooting portals

Test Chamber 4
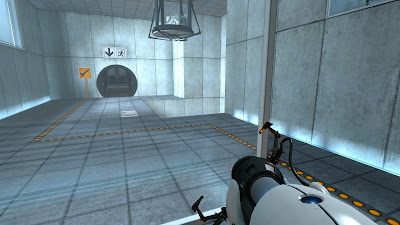
 When you walk into the chamber you are faced with a locked door and a massive red button. If you think that stepping on the button opens the door, you are right. However, the door closes as soon as you step off, so you must find something heavy to keep the button depressed.


As you step past the protective glass, you see a pre placed portal and a pit that upon further inspection is not one that will kill you. (you death brings joy to GlaDOS)


On even further inspection, you see a large cube; Could it be that this cube is a similar weight to your player character? Let's find out. 

As I have played through both Portal and Portal 2 at least 3 times, I tend to take shortcuts/get lucky with my portals. In the above screenshot, I skipped the part where I jump down to fetch the cube and just aimed my portal to go directly under it.Since this pit wouldn't kill you if you fell into it and this puzzle is very early in the game, either option is viable. 

Once the cube falls ever so gracefully out of the pre placed orange portal, you can place it on the massive red button and move onto the elevator and to the next puzzle. 


This puzzle is rather early in the game, so it is meant to teach players how to think outside the box since this mechanic is pretty darn new to gamers. You are meant to experiment and see what happens when you step onto the button and if the door stays open when you step off. The clear glass is placed deliberately so the player has a line of sight to their end goal. I taught teenagers last summer how to make puzzles for Portal 2, and one of the ideas I tried to hammer into their heads was that the player should be able to see their end goal and how their actions affect their path to the goal. Most of them intentionally ignored this by removing the indicator lights that connect buttons with the object that the affect. The indicator lights are blue when they are passive and become orange when the button is activated. 

All of the parts you need to solve the puzzle are easy to see and the small size of the level lends itself to this. The player wanders and uses their problem solving skills to connect the fact that the cube must be retrieved and placed on the button to enable the player to pass through the end goal door. 

If i was to give this puzzle a classification, I would say that it is an excluded middle puzzle. The player sees that the big red button always causes the door to open, but when they step off, they see that the door closes. The button is A and the door is C, they need to find the mid point of the puzzle. Most puzzles in Portal are put together this way, where the player can technically open the door, but without the missing piece, they are stuck. 


Despite this being one of the easiest puzzles to solve in the game, it already makes the player feel smart because they have use their one portal to move an object to a puzzle element that allows the player to progress. 


Sunday, September 20, 2015

Isometric views

 4 Arm mounted blast shield- Expanding energy shield to block projectiles.Constant barrage of things flying at player that they must block. Recharges over time, so player must use the shield wisely or they will be smushed.
  5 Tractorbeam gun- Energy gun that pulls objects within a certain distance toward player.Build your own route out of a pit using debris.  Climb up similar to escaping the planet in the metroid game. Make wise decisions while using the machine however, you only  have a certain number of uses.

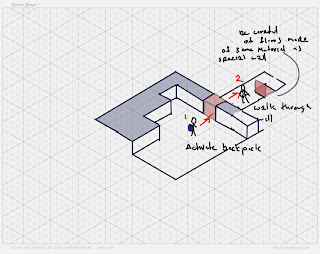
. 6 Dematerializing backpack. Gives players the ability to walk and see through solid walls. Cheat your way though a maze where some walls are not solid, but also some floors are not, so step carefully.


Wednesday, September 16, 2015

10 Toy ideas


1 Water powered Jetpack- Tanks on the back will be filled with water and deplete over time. Short bursts to overcome short obstacles but unable to get much lift without depleting entire tank. Think sunset overdrive with just the jumping mechanic.


2 Rocket Rollerblades- Two wheeled roller blades with articulated rockets on each side of the foot. Fast travel option but if the player hits walls too much they will explode due to the highly volatile fuel. Game would be a race when extra fuel is picked up quickly, but missing one or two may cause the player to stall.

3 Claw-based wall climbing gloves- self explanatory. Kind of like a cat climbing a scratching post. Retractable. Verticle based gameplay.

4 Arm mounted blast shield- Expanding energy shield to block projectiles.Constant barage of things flying at player that they must block. Recharges over time, so player must use the shield wisely or they will be smushed.

5 Tractorbeam gun- Energy gun that pulls objects within a certain distance toward player.Build your own route out of a pit using debris.

6 Dematerializing backpack. Gives players the ability to walk and see through solid walls. Cheat your way though a maze where some walls are not solid, but also some floors are not, so step carefully.


7 Shockwave cannon-  push force from center of gun out to push enemies and obstacles away. Big burst with gradual power recharge. Can be used before full charge, but will be less powerful. Sort of a mix between the idea of TF2's sniper and Samus from Metroid's charge cannon.

8 winged backpack- allows upward and forward boost for short time; cannot stay airborne for long. Flapping of some sort cause that's just super cool. Vertical based platformer, like escaping at the end of a Metroid level.

9 Fire extinguishing vortex glove. – Spiral of air shoots out of palm to push out fires and give a slight push to objects. Escape the burning building, find air pockets to reabsorb oxygen or you will suffocate and your extinguisher will run out of air.

10 Propeller backpack. Similar to a quad copter, 4 articulating propellers mounted to a central backpack. Allows for hovering but is prone to failing if player hits roof.

Friday, May 1, 2015

Extra Portfolio Images.

Here are my car and character turnarounds in wireframe with polycounts.

Sunday, April 26, 2015

Final Attract Trailer


For the final portion of the racing game, I edited together some footage to create an attract trailer for the game.

Friday, April 24, 2015

My character with a cool sassy animation. The animation is not part of the final, but I wanted to do this sort of video to put them in the same video, so I got this animation from Mixamo.

Thursday, April 16, 2015

Arcade: Smash TV


Prioritized feature list

1. Player Locomotion: 8 way cross directions, shooting(Tim)

2. Enemy behavior: Move towards you and try to attack, no advanced pathing, can be solved with a find look at and movement. (Tim&Zaq)

3. HUD: Score, Ammo for special weapon, lives, notification of pickups (Note, Score and ammo are located in the level, not on HUD, but in ours it will all be on UMG) (Tim)

4. Player health and respawn, Pickups: 1 health point and 5 lives (Health and respawn: Tim, Pickups:Zaq)


5. Wall collision: walls block you; each has a door that is locked until you clear room


6. Game Camera: Top down, static per room and moves to next room as you exit. (Tim)


7.  Hazards: land mines, as you move on, more are present if appropriate. (Tim & Zaq)

8. Score: money, gold and presents and rewards (such as A BRAND NEW VCR) give you score. Most likely will involve an array with point values assigned and different 90s era rewards. (Zaq&Tim)


9. Companions: Some powerups give you short companions that hover around you as a powerup (Zaq)

Sunday, April 12, 2015

Need for Speed: Hot Pursuit Trailer


I chose this trailer due to two factors. Mostly, based on how well and efficiently it shows the new mechanic for this iteration of NFS where you play as a cop. Secondly because, like all my posts about Mario Kart 8, I legitimately really like Need For Speed: Hot Pursuit.

     The main purpose of this trailer, as exhibited by the title, was to show off the weapons that the police has access to. Throughout the trailer, you get to see each tactic of taking down a racer while seeing only real gameplay.

First, you see the easiest tactic and one that doesn't require any recharge and is available to both the racers and the police, which is ramming them.
   
Then you see the EMP attack, which requires steady driving and aim lock in order to hit. When it does hit however, it proves to be deadly.

After some more creative driving, you get to see the spike strip, something that gets exponentially harder to dodge the closer the racer is behind you. This shows that you need to be aware of all your surroundings if you want to successfully take down all those pesky racers.

I don't need to go over the entire breakdown of the trailer since the helicopter is a more effective and surprising version of the standard spike strip. Either way, you get to see all of the take down tactics (besides the Block, which is a row of squad cars to block the road perpendicularly) and see the game in action without all of the not so helpful but often pretty pre-rendered graphics that are so popular in many trailers. The trailer is able to show you an entire race in just under 2 minutes of gameplay that is only interrupted by actual in game cut-aways of takedowns, making it a very effective and concise showing of the game that makes you want to see and play more.

Wednesday, April 8, 2015

Speedometer/HUD research and mockup

My character is somewhat of a 1970s punk who drives a 1970 chevelle SS painted Taxi cab yellow. I want their identity to come through somewhat in the HUD without it being too much. Here is some of my research for my HUD.

I like Rockstar's simple and bold approach to the HUD, and aesthetically, it is very similar to the type I want to make, other than mine matching my car's make. Most racing games give you some sort of indication of your speed, but not all will give you numbers to match your speed exactly, and most instances of a tachometer are simply another aesthetic detail on the screen that for all games other than racing Sims, has no need on the HUD for most arcade style games.

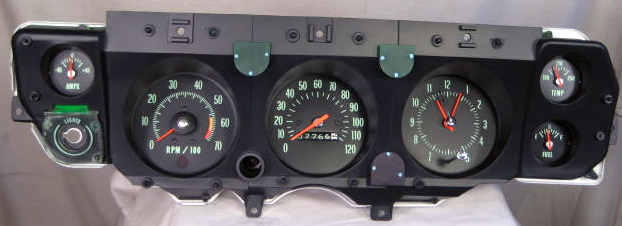
Here are a few real world examples of that type of speedometer

This Speedometer is not one from a 1970 Chevelle SS, but I like it for its worn look and checker Cab logo. 


     Here is a mockup of how I want my HUD to look like, more or less


Wednesday, April 1, 2015

Sand blowing particle research and tutorial

       For my particle, I want to make blowing sand and dust in the wind. I used a combination of an official unreal tutorial and an eat 3d tutorial to make 1 first layer of my particle.

I used the Unreal tutorial to make an interesting material that can be dynamically affected by a particle system for X and Y offset.
The eat 3d tutorial I used to learn how to make it spawn in the correct manner, although their tutorial was for static dust, which while I cannot say if that will be 100% useful for my main particle, I wil msot likely use it for the more idle areas of my track (such as in the section of my track where you go through the gun tunnel, despite being a short section.)

I will most likely add on at least two more modules for the particle such as a smoke texture for the small shifting sands and also a dynamic material that acts as a sheet of sand.

Here is my visual target for my final particle once assembled, and the two videos I used to make my particles.


Monday, March 30, 2015

Super quick snow particle

      Today after being inspired by an example in the editor, I decided to take it upon myself to recreate what I miss most from home, snow. This particle took maybe 20 minutes to make and an additional 10 minutes to tweak. It cannot be perfect based upon that amount of time, but for having just started using Cascade, I was pretty happy with myself.


Wednesday, March 18, 2015

My Short, helpful class blueprint to test a basic skin/blood shader

I decided to mess around with the subsurface shader settings in the material editor (and for this particular example, the two sided foliage one) to try to start to replicate how human flesh functions with strong light.

I needed a quick and simple class blueprint that would let me mess lower and raise two light intensities independently. It is by no means a difficult or particularly momentous achievement, but the practice made it feel like something worth showing, especially since the shader looks pretty awesome!


Thursday, March 5, 2015

My favorite racing game Intro


     Mario Kart is one of the few modern racing games that still does an amazing job at familiarizing the player with the track in a short 10 or so second intro sequence. Cloudtop cruise, my undisputed favorite Mario Kart track, only really needs to show two shots the introduce the player to their environment and let them know what to watch out for.
     The first shot shows the calmer and more twisty section of the race on the pleasant clouds. It introduces the visual motifs as well as one of the more difficult turns on that section if you were to be unfamiliar with the track.

     The second shot introduces you to the more industrial and scary parts of the map, where you are not only on an anti-gravity portion, but is also a faster and more dangerous part of the map with a unique obstacle; Lightning. The beginning of the shot guides you through the main curve of the track and the end of the shot showcases where the lightning is likely to strike.


     I think this is an amazing race intro because it is able to show a huge amount of the level and its mechanics in just about 10 seconds. I think I could use this type of camera movement and shot language to show my obstacles (tanks and blocked paths) so the first lap is as easy as possible for the player to understand and not make any mistakes that would cause them to have to reset or adjust after and epic crash.

Wednesday, March 4, 2015

Sunday, March 1, 2015

Explosive "barrel" and turret design.

For my barrel, I am thinking I will do a wooden ammo crate or some sorts to fit with our theme of an "Mexizona" military base.

I was thinking of something like these:
For my turret, i will be adapting my design for my level's giant set piece gun to make a smaller, visually similar model that I could use towards the final model of the other artillery piece.

Here is what I was thinking of that I modeled quickly.


Thursday, February 19, 2015

Friday, February 13, 2015

Thursday, February 12, 2015

New stunts and Map. Also storyboards

I am going to partner up with Tim (http://callforhan.blogspot.com) for our level concept "Fort Mexizona"

So i redid stunts and a new map to fit in and to make my storyboards. 


Wednesday, February 11, 2015

Arrays pt 2


I had an interesting and frustrating experience with this array due to something either in Unreal or my programming not allowing me to create more than 24 rows in an array. I spent at least an hour making a text file that was 32x32, but when I went to output it, the array refused to create my last 8 rows. After no luck in fixing my issue, I decided to downsize to an array that I knew worked and try again another time. This array challenge was much easier to understand and comment out and much more versitile, I really liked it other than some overall confusion!.


Sunday, February 8, 2015

Racing level concept ideas

"Reach for the skies and keep on reaching"

My first idea was something related to Nikolai Tesla but his most famous invention being the Tesla coil felt very limiting. Even if the concept of city in the sky is a a popular one, I want to use that as my concept, but implement things similar to Tesla coils.

 The main landscape of my level would be floating platforms in the clouds on some sort of hub area. The terrain of my level will be mostly metal and ceramic-looking panels. The time of day would be between evening and dusk, with a sort of color scheme like this:

The panels and detail lighting would be shades of light purple like this 
The whole floating platform is a self-sustaining ozone repair machine so many of the stunts would involving a dynamic map. Some of the magnetic panels are misaligned and many aspects are acting up, making traversing the platform difficult. As you complete laps, parts fall away such as the first bridge and you are forced to drive on the magnetic wall to the right of the bridge. Also new paths become aligned with the main path and shortcuts become available. Because of this, each lap is a different gameplay experience. 

One of the landmarks is a very large coil that you drive through off a jump and it boosts you foreword. Inspired by a Tesla Coil. 

Another landmark/event will be after the first lap, one section of panels will become unstable and wobbly. On the third lap, these panels will start moving laterally and must be navigated or you will fall off the level. 


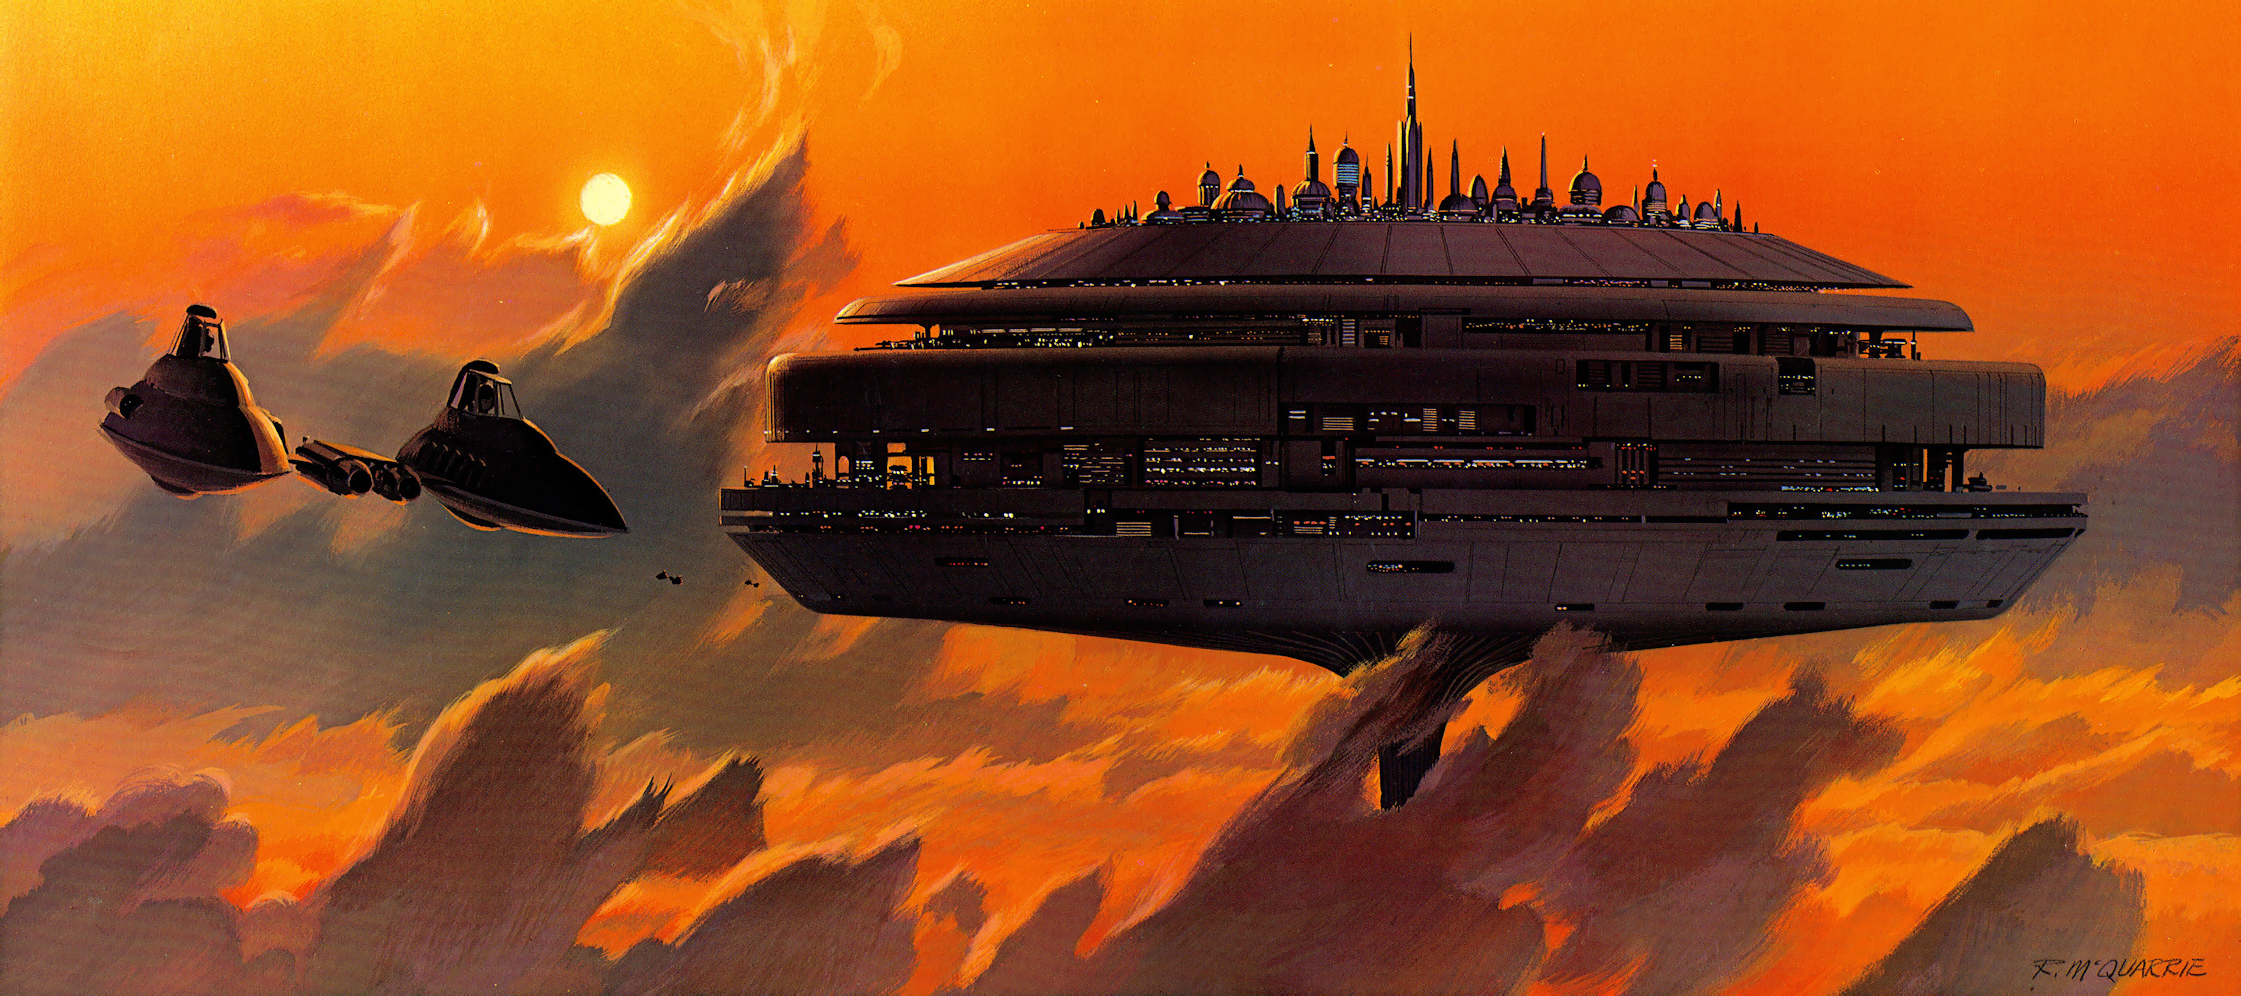
The intensity of the level will increase as the main path panels vanish and are replaced by stunts. A large theme of the level is electricity and magnets, so the visual stylings will reflect this as much as possible. The panels would be very smooth and fluid. One of the main inspirations is cloud city from Star Wars: 

The panels will be slightly reminiscent of the interior of the interior of Cloud city's carbonite freezing room. 

There will be animated sequences of lights moving in the direction the player will be moving as well as signs. 

Additional terrain and features could include burst pipes and vapor shooting out. This could be another stunt involving propelling the player or forcibly diverting them. The magnetic panels would have a distinctive and memorable light pattern or configuration to show the player what is magnetic versus just plain ceramic/metal. 


Racing level stunt research.

As soon as I think of stunts, I think of jumps. BUT, in racing games, big jumps are totally weaksauce, so I thought to go more extreme and find something that I have never seen before in a game (at least the ones I have played).  I saw this video and I knew that I wanted to implement a portion of my level with some sort of stunt like this, even if an artificial force keeps you to the wall.


When looking into interesting mechanics in games that impact the track, whether it is helpful tot he player or actually hinders them, I immediately was reminded of Tick tock clock from Mario Kart DS and 8. Throughout the level, there are clock hands and gears that can act as shortcuts and death traps depending on how you approach them.

You can either go around the clock hands, or if you're daring, you can try to use them as a shortcut. each lap, they change position and become harder to use. In another part of the level, the clock hands are a path to death on the first 2 laps, but on the 3rd lap, they are a huge shortcut. 

A cool example of a level where the level is essentially attacking you and all other racers is Motorstorm Apocalypse "Bridge to nowhere" The cliffs are falling apart around you, making the racing surface uneven and ripe for ramming other racers to their doom by way of falling off the level or exploding against a wall. At one point in this playthrough, the light house falls and create a large obstacle in the middle of the road. 


I

Wednesday, February 4, 2015

Arrays!

     In programming, we are using blueprint in UE4, and we have been learning arrays. We made a light array that would turn a light on in a row of 12 and each would sequentially turn on as the last one turned off. We also added the option to have more than one on at the same time.

For convenience, I set the delay between each light activating to a public variable so i could change it on a per blueprint basis. I also went above the criteria of the assignment and implemented a public set of variables to change the RGB values of the lights. For fun and a little bit of randomness, I added a boolean onto the "set Light color" node that when it is true (When I tick the box labeled "Random?") in the blueprint details panel) it will make each light in the sequence a random float within the range of 0 to 1, which is the color range in Unreal 4.

After soem experiementing, I managed to figure out how I could change the offset of the lights in the details panel and with a few copies of my array blueprint, made a sweet arrow, which becomes even cooler when its color is set to random.

here is my array below.

Wednesday, January 21, 2015

Platformer Pitch: Safety Inspector.

     In typical platformer fashion, my level is set in a much more dangerous situation than the saem situation would be in reality. My current idea of a setting is a Spike factory for all the other sidescroller games that need environmental hazards under inspection for safety. Of course, the factory is nowhere near in safe condition as there are pits full of spikes and spikes on the ceiling, as well as at least one malfunctioning elevator. Like any safety inspection, no one was expecting it, so it is in the middle of a normal work day and no one was prepared.

      The Architecture would be steel girders and I-beams and factory equipment and service elevators. The factory's product, spikes, are strewn everywhere and stuck to places that they have no business being stuck.

     Prior to the inspector's arrival, the workers were clumsy and kept making mistakes and not taking care of their factory, leading to the condition it is currently in. The Inspector, who we can call Tony, made his surprise visit to the factory and was in horror at its condition. Nevertheless, he still needs to do his job and try not to be another workplace death in this mismanaged and disorganized factory.


Thursday, January 15, 2015

Level tutorial analysis.

     The moment that you enter the first level of Super Mario World, an enemy comes sliding towards you and you know you either have to kill it or jump over it. Games from this era teach you how to play without making you feel babied or plain old stupid. Once you escape this enemy you are greeted with a massive bullet and you panic to discover you can crouch. Or well, you die as you have yet to get a super mushroom.
     The types of obstacles and number of enemies get increasingly harder as you progress through the level. The first enemy you encounter is a Koopa without its shell. The second that you are able to fight is a dinosaur that takes two hits to kill. Already by the second screen you are challenged. As you learn, and you will learn quickly, the level's difficulty rises but does not reach a point where completion is impossible.

     The player is left to figure out most of the mechanics on their own, but the situations they are put in (such as the first enemy you see slides down to you), help the player figure out what to do. Tip blocks exist in most levels in this game for players to learn things that are not immediately obvious. There are two in this level with this basic information.
  • You can carry an extra item if you already are powered up. It can be accessed by pressing SELECT. (or in my case on the Wii U, the - button)
  • You can pick up shells to throw at enemies with your sprint button.

      If the player experiments, they discover new things, such as that Mario's spin jump can break the light yellow block with eyes on them, and that either of his jumps break most types of blocks. If the player breaks the right blocks, there is a secret pipe that has coins and a Yoshi coin. The player learns from experience rather than having the controls and concepts shoved into their face.

     The most basic form of "negative feedback" that is given to the player is that if they are powered up, and collide with an enemy, they will power down, or if not powered up, will die and return to the hub map. 


The story is integrated into the level slightly by introducing a new enemy, a bipedal dinosaur, within the first few steps. This is an introduction to later levels where you meet Yoshi, a much more friendly dinosaur.

Here is basic navigation and being hit by an enemy, as well as the tip block being put the use.